Running a Matrix homeserver (like Synapse) on localhost without DNS can be done for testing and development purposes.
Here's a general outline of the steps that needs to be followed:
Prerequisites:
Install Python: Synapse is written in Python, so make sure you have Python installed on your system.
Install pip: This is the Python package manager, which you'll use to install Synapse.
Configure Python virtual environment for all subsequent installations like this:
python3 -m venv path/to/venv
source path/to/venv/bin/activate
pip install package_name
pip install matrix-synapse
python -m synapse.app.homeserver --server-name your.server.name --config-path /path/to/config
Replace your.server.name with a unique server name. Modify the generated configuration file (/path/to/config) to your requirements.
In your configuration file, you may want to set the listeners section to bind the server to your localhost IP (e.g., "127.0.0.1") on a specific port (e.g., 8008) to ensure that it only listens on your local machine.
Create a Self-Signed Certificate:
For testing purposes, you can create a self-signed SSL certificate. This step is optional but recommended if you want to use HTTPS.
You can create a self-signed certificate using tools like OpenSSL.
openssl req -new -newkey rsa:4096 -days 365 -nodes -x509 -keyout server.key -out server.crt
Then, configure your Synapse server to use these certificates in your configuration file.
Database Configuration:
Configure the database settings in your Synapse configuration file. For Postgres follow these steps:
sudo apt install postgresql postgresql-contrib
sudo -u postgres bash
createuser --pwprompt synapse_user
createdb --encoding=UTF8 --locale=C --template=template0 --owner=synapse_user synapse
exit
Setup postgres database for synapse home-server. Un-comment and edit listen_address variable in postgresql.conf
located at /etc/postgresql/<postgres_version>/main/postgresql.conf.
For version 15:
sudo nano /etc/postgresql/15/main/postgresql.conf
#------------------------------------------------------------------------------
# CONNECTIONS AND AUTHENTICATION
#------------------------------------------------------------------------------

# - Connection Settings -

listen_addresses = 'localhost'          # what IP address(es) to listen on;
Save and exit.
Then edit pg_hba.conf file and add a line to enable password authentication so that 'synapse_user' can connect to
'synapse' database
sudo nano /etc/postgresql/15/main/pg_hba.conf
local synapse synapse_user md5
# Allow replication connections from localhost, by a user with the
# replication privilege.
local   replication     all                                     peer
host    replication     all             127.0.0.1/32            md5
host    replication     all             ::1/128                 md5
local   synapse         synapse_user                            md5
config.yaml, so it looks something like thisdatabase:
name: psycopg2
args:
user: synapse_user
password: <pass>
database: synapse
host: localhost
cp_min: 5
cp_max: 10
psycopg2 in Python virtual environmentpip install psycopg2
pip install psycopg2-binary
python -m synapse.app.homeserver --config-path /path/to/config
Access your Homeserver:
You can access your Matrix homeserver by using a Matrix client such as Element. Point your client to your localhost IP and the port you configured in the listeners section. For example, http://127.0.0.1:8008.
User Registration:
Register a new user on your homeserver using your Matrix client.
Remember that running a homeserver without DNS means you won't be able to access it from other devices on your network or the internet. It's suitable for local testing and development purposes. If you want to make your homeserver accessible outside your localhost, you'll need to configure DNS and network settings accordingly.
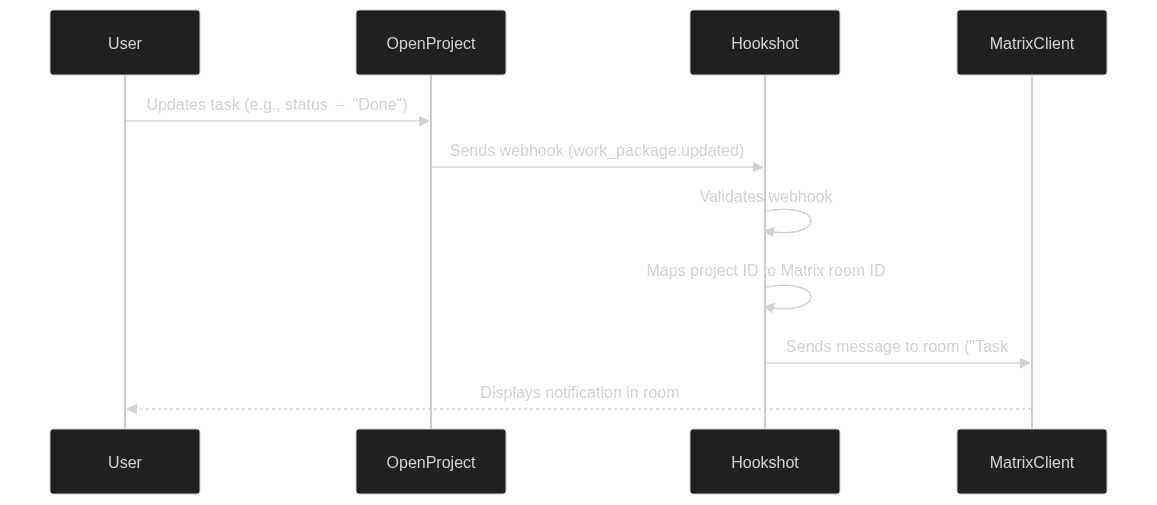
This integration bridges OpenProject, a project management tool, and Matrix/Element, a decentralized communication platform, using Matrix Hookshot. The integration enables seamless project collaboration by syncing users, projects, and notifications between OpenProject and Matrix/Element.
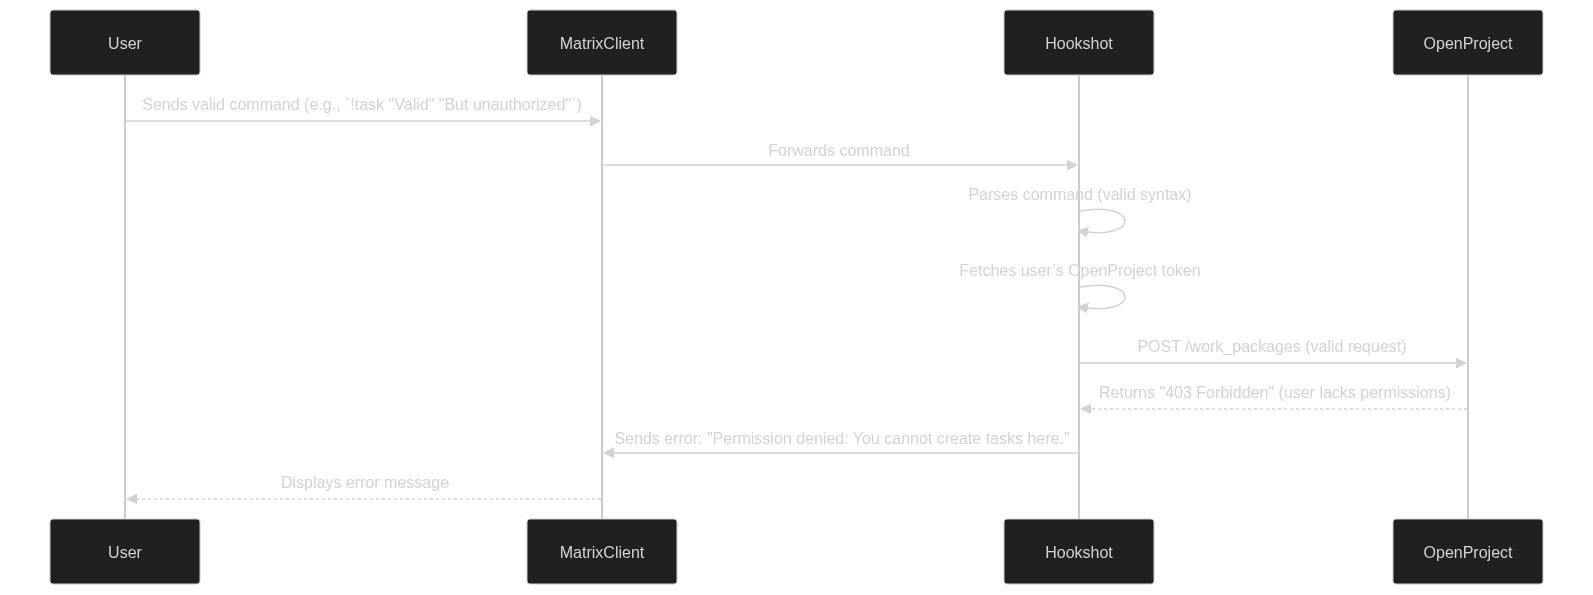
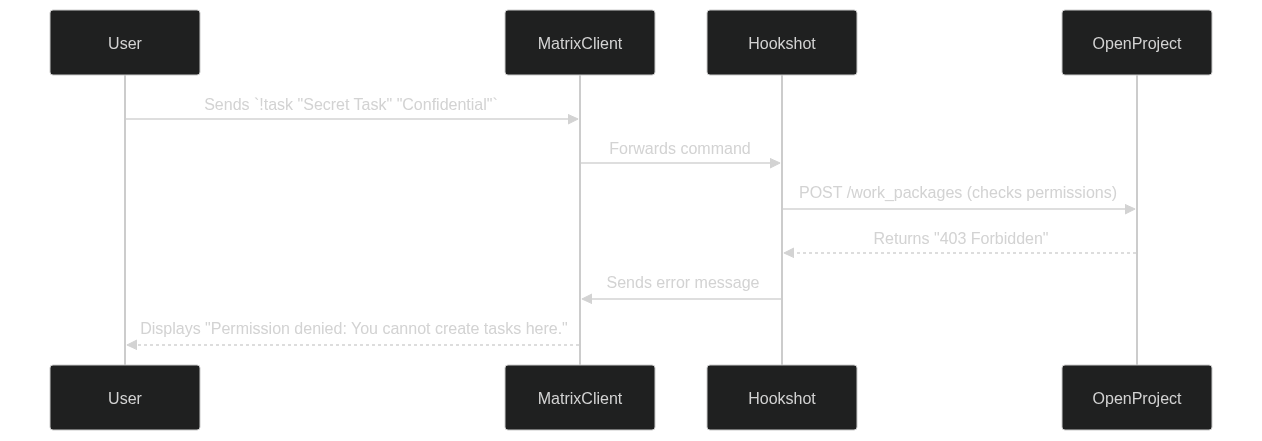
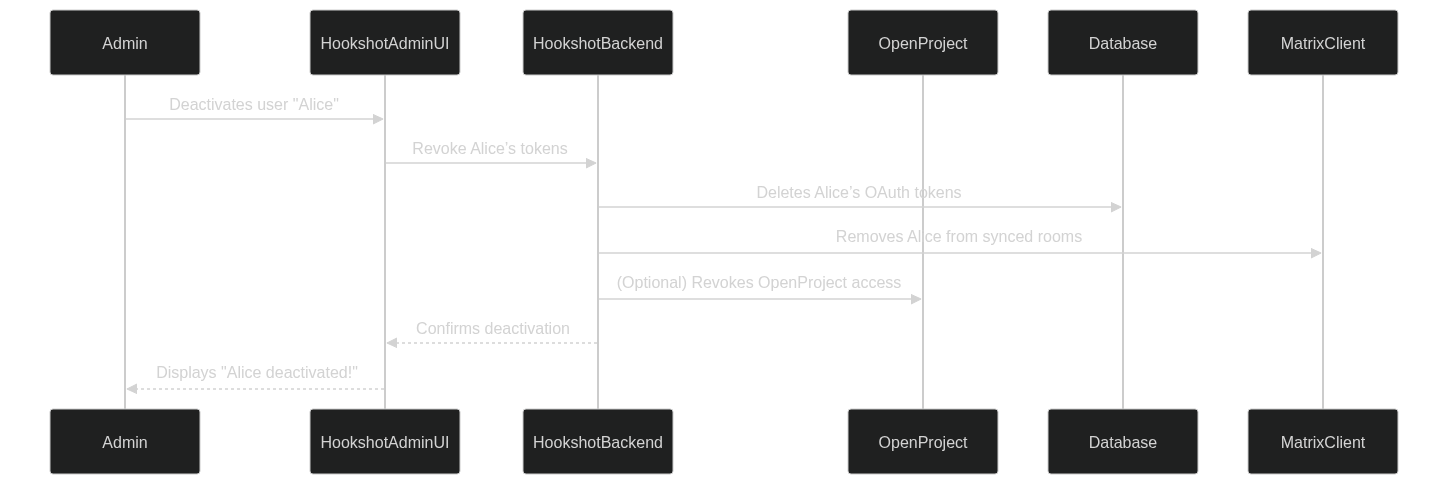
Permission Management:
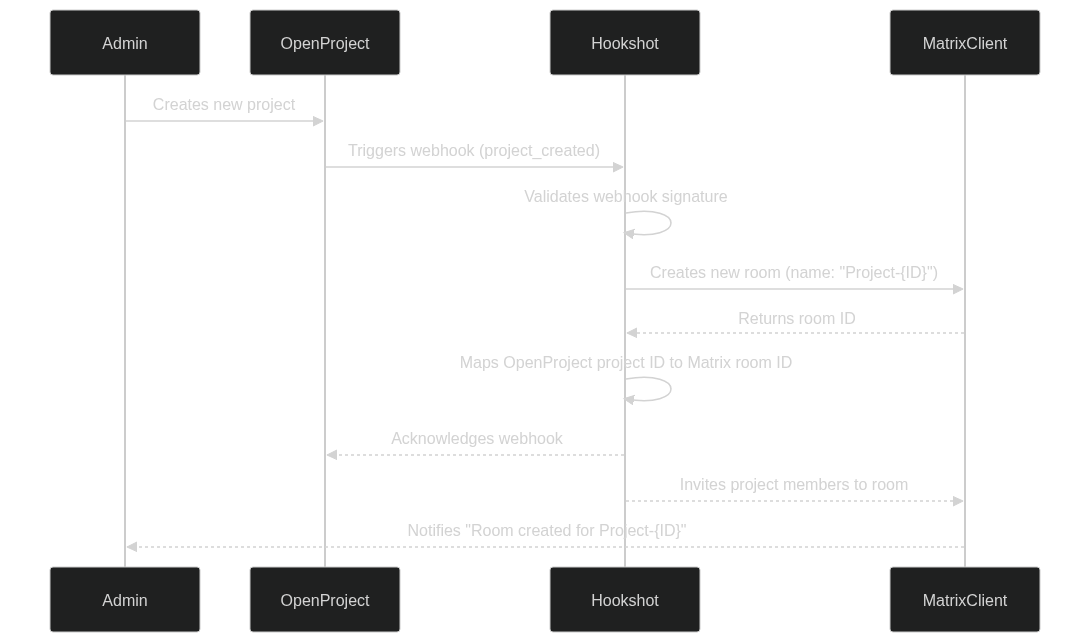
Project Room Creation:
User Synchronization:
Future Enhancements:
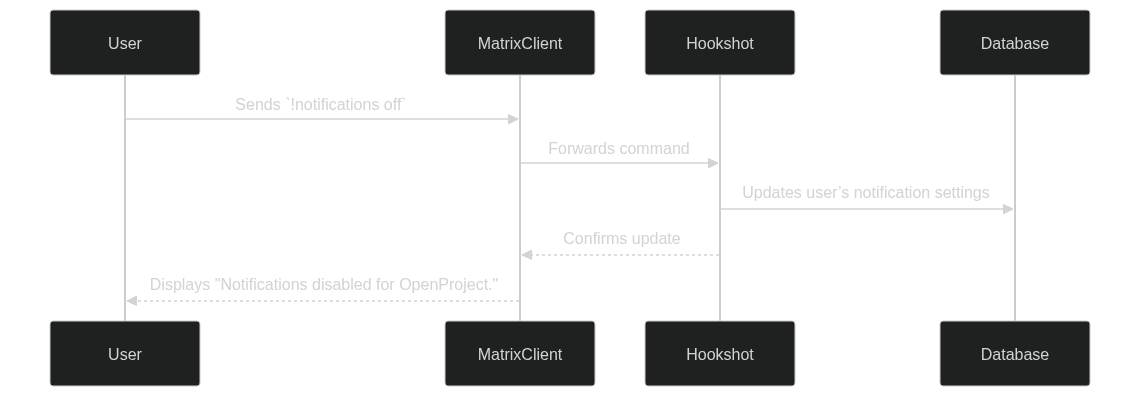
Subscription to OpenProject notifications in Matrix.
Real-time work package updates in Matrix.
Matrix Hookshot:
Clone your fork of the Matrix Hookshot repository.
Install Node.js (v16 or later).
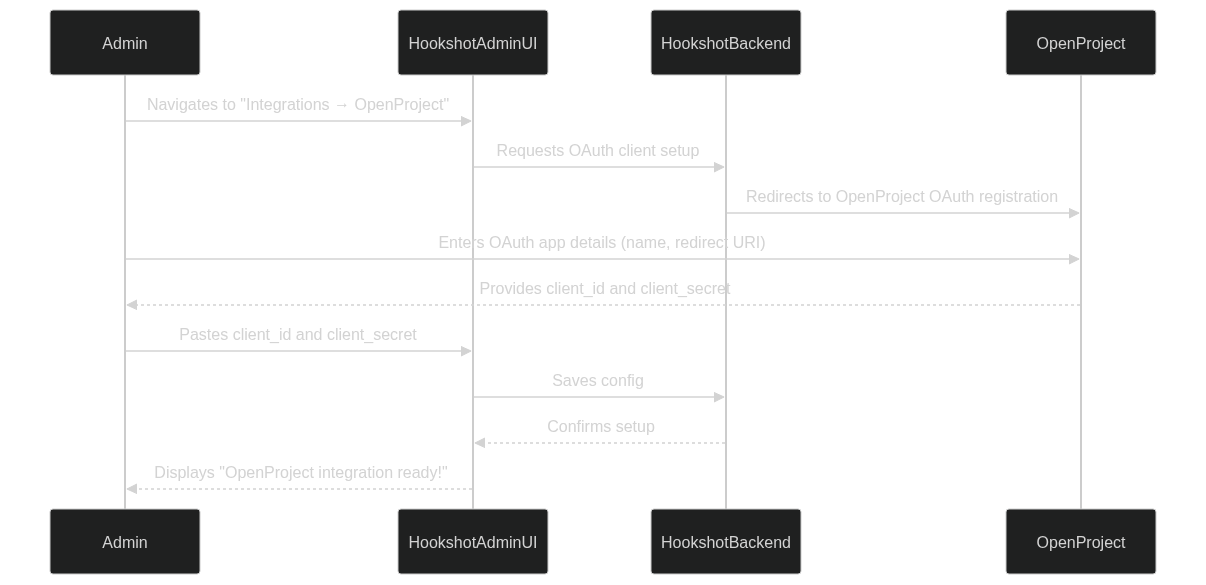
OpenProject:
Access to an OpenProject instance with API enabled.
Generate an API token for the bot.
Matrix Server:
Access to a Matrix server.
Create a bot account and generate an access token.
Configuration Files:
config.yaml and .env with OpenProject and Matrix details.git clone https://github.com/girish17/matrix-hookshot.git
cd matrix-hookshot
npm install
Create a .env file with the following:
OPENPROJECT_URL=https://openproject.example.com
OPENPROJECT_API_KEY=your_api_key
MATRIX_HOMESERVER=https://matrix.example.com
MATRIX_ACCESS_TOKEN=your_bot_access_token
Update the config.yaml file:
integrations:
  openproject:
    url: "https://openproject.example.com"
    api_key: "your_api_key"
npm run build
npm start
Trigger: A user joins a Matrix room linked to an OpenProject project.
Action: The bot maps the Matrix user to an OpenProject user and updates their project membership.
The m.room.member event is captured by the Matrix Hookshot bot.
The bot retrieves the project ID linked to the room.
The user is added to the OpenProject project with the required permissions.
async function onRoomMemberEvent(event, roomId) {
    if (event.membership === "join") {
        const userId = event.state_key;
        const projectId = await getLinkedProjectId(roomId);
        const openProjectUser = await mapMatrixUserToOpenProject(userId);

        if (openProjectUser) {
            await addUserToOpenProject(projectId, openProjectUser);
        }
    }
}
Trigger: A new project is created in OpenProject.
Action: A private Matrix room is created, and the project is linked to the room.
A webhook from OpenProject triggers the bot.
The bot creates a private Matrix room with the project name.
The room ID and project ID are stored for synchronization.
async function onProjectCreated(project) {
    const room = await matrixClient.createRoom({
        visibility: "private",
        name: project.name,
        topic: `OpenProject: ${project.name}`,
    });

    await linkRoomToProject(room.room_id, project.id);
}
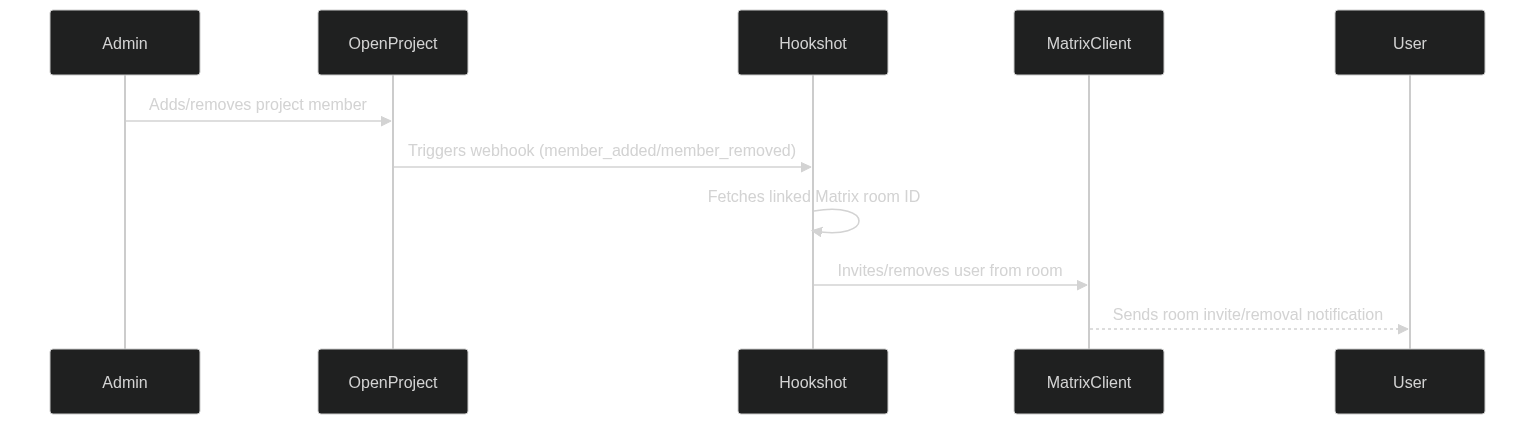
Trigger: Member changes in OpenProject (add/remove).
Action: Reflect these changes in the linked Matrix room.
Periodic synchronization task or OpenProject webhook triggers the bot.
Compare OpenProject members with Matrix room members.
Add/remove users in the Matrix room to match OpenProject.
async function syncProjectMembers(projectId, roomId) {
    const projectMembers = await getOpenProjectMembers(projectId);
    const roomMembers = await getMatrixRoomMembers(roomId);

    for (const member of projectMembers) {
        if (!roomMembers.includes(member)) {
            await addMemberToMatrixRoom(roomId, member);
        }
    }

    for (const member of roomMembers) {
        if (!projectMembers.includes(member)) {
            await removeMemberFromMatrixRoom(roomId, member);
        }
    }
}
npm start
ngrok http 9000
Configure the Ngrok URL in OpenProject webhook settings.
Trigger events (e.g., project creation, member addition) and verify in Matrix.
Feature |
Test Scenario |
Expected Outcome |
|---|---|---|
User joins Matrix room |
Join a linked room |
User added to OpenProject project |
Project creation |
Create a project in OpenProject |
Matrix room created and linked |
Member synchronization |
Add/remove members in OpenProject |
Members synced in Matrix room |
npm run build
Deploy on Server:
Use Docker or a cloud service (AWS, DigitalOcean).
Ensure environment variables are securely configured.
Webhook Setup:
Subscription to OpenProject notifications in Matrix rooms.
Opening work packages directly in Matrix.
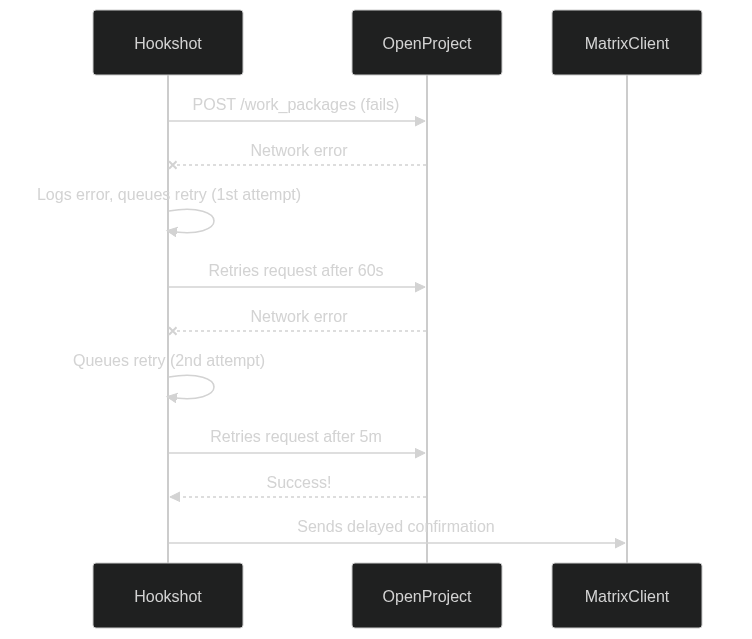
Improved error handling and logging.